

Introduction
Batch processing is one of the sort-after requirements for data engineering roles and getting a data engineering project running batch processing on the cloud can be time-consuming. This tutorial covers some core batch-processing components you can apply to your projects.
In this tutorial, you will create a data pipeline infrastructure to track a bank's loan category and visualize each category's loan metric data.
Objective
Let's assume you work for a bank as a data engineer and have been tasked to create a batch-processing workflow that tracks the number of loans in each bank loan category daily. Using your experience as a data engineer you need to make the loan tracker metric data available to both decision-makers and end users.
Setup
Prerequisite
Docker
AWS account
AWS CLI installed and configured
Clone and cd into the project directory.
git clone https://github.com/Adematics/beginners_batch_project
cd beginners_batch_project
For this project we use
3 m4.xlarge type nodes for AWS EMR cluster.
1 dc2.large for AWS Redshift cluster.
1 iam role to allow Redshift access to S3.
1 S3 bucket with about 150MB in size.
1 t2.large AWS EC2 instance
Design
The Airflow orchestration workflow orchestrates the following.
Classifies your loan tracker metrics using Apache Spark.
Load the loan tracker metrics into your data warehouse.
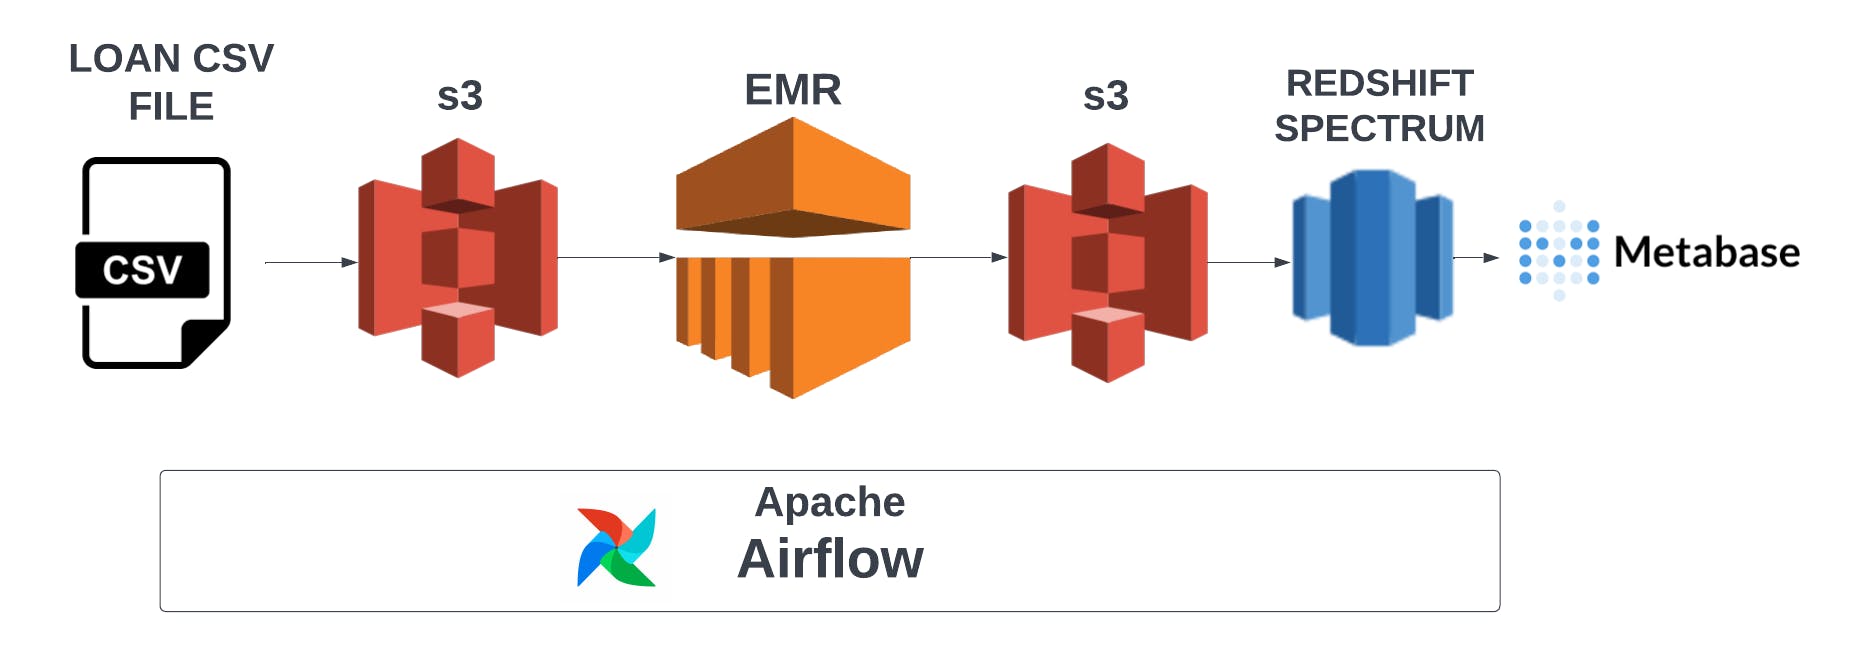
- Metabase handles the visualization of your loan tracker metrics.
Deploy AWS infrastructure
To set up your AWS infrastructure. Run the setup_infra.sh script in your project.
./setup_infra.sh {your-bucket-name} # e.g ./setup_infra.sh my-bucket-project
The default region set for this project is us-west-1 . You can modify the AWS region to your preferred region in the infra_variables.txt. file and setup_infra.sh file in your project directory.
The setup script sets up the following components.
1 AWS EC2, running Airflow and Metabase
1 AWS EMR cluster
1 AWS Redshift cluster
1 AWS S3 bucket
After running the script you can log in to your:
Airflow running on port localhost:8080 (username and password are both airflow)
Metabase running on port localhost:3000
The first time you log in to your Metabase account, you will need to create a username and password. To establish a connection to your Redshift cluster, you will need your Redshift host, which you can get using the command below.
aws redshift describe-clusters --cluster-identifier sde-batch-project --query 'Clusters[0].Endpoint.Address' --output text
The port, username, and password are in your infra_variables.txt and the database used is dev.
You also need to run the redshift-setup.sh file in your directory after setting up your infrastructure to set up your schema for your Redshift data warehouse used for this project.
./redshift-setup.sh # This sets up our redshift schema.
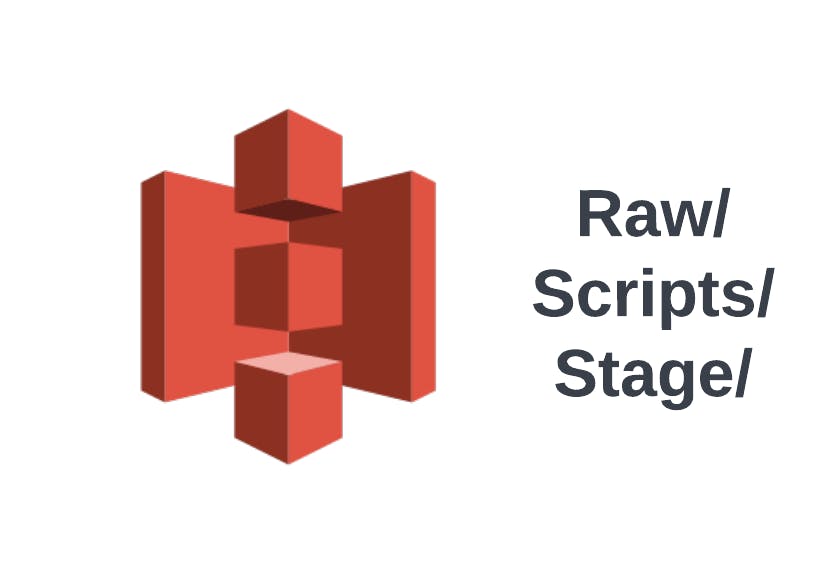
Data lake structure
The data lake which is AWS S3 consists of the directories where your data would be stored before and after being processed. This data lake contains different directories in one bucket which consists of
Raw : To store your raw data in your data lake before being processed.
Scripts : This is where your spark script is stored which is used by AWS EMR.
Stage : This is where your loan tracker metric data will be stored after being processed.
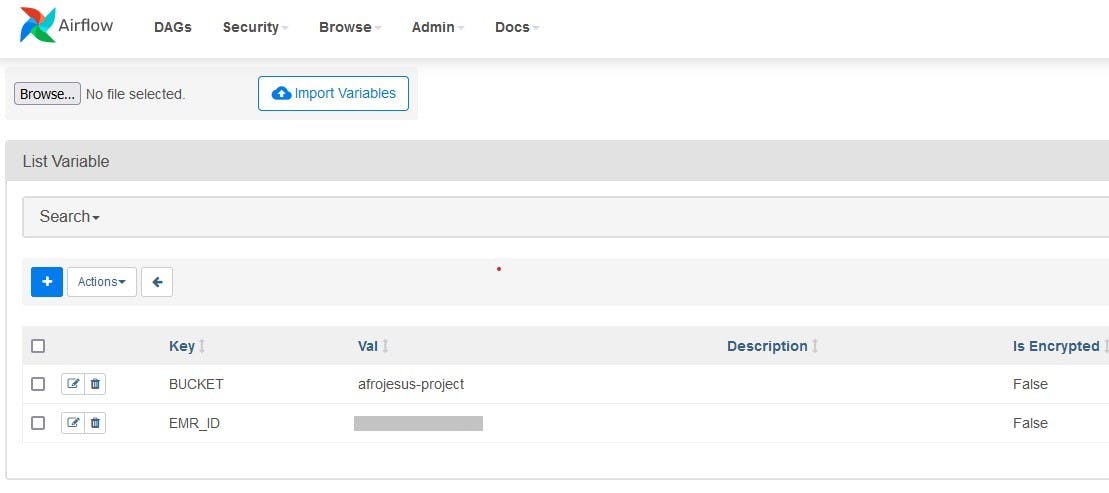
Airflow configurations
The setup script also sets up Airflow connections and variables containing the following:
Redshift connection: To connect to your AWS Redshift cluster.
BUCKET variable: To indicate which bucket is used as the data lake for your pipeline.
EMR_ID variable: To send commands to your AWS EMR cluster. Using the Airflow user interface (UI) you can view these configurations as shown below.
Code walkthrough
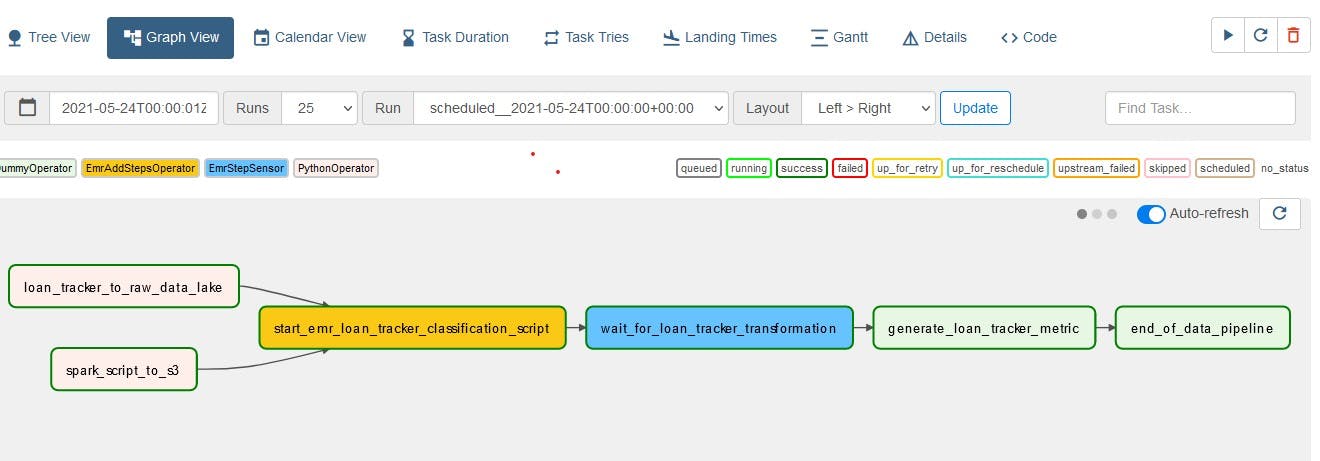
To load the loan tracker data into the data warehouse, the following Directed Acyclic Graphs (DAGs) are created:
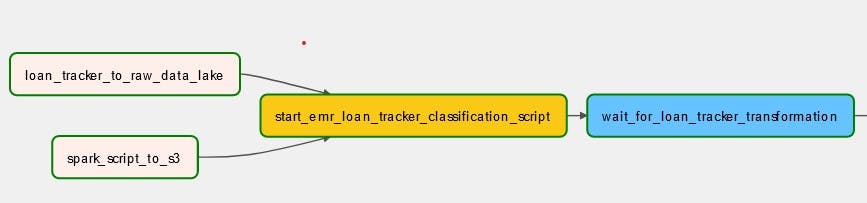
Loan_tracker_to_raw_data_lake: Copies local file ./dags/data/loan.csv to data lake’s raw.
spark_script_to_s3: Copies your Pyspark script to the data lake’s script, which is referenced by AWS EMR.
start_emr_laon_tracker_classification_script: Adds the EMR steps defined at dags/scripts/emr/clean_loan_tracker.json to your EMR cluster. This task adds 3 EMR steps to your cluster, which are:
Moves raw data from S3 to HDFS:Copies data from the data lake’s raw area into EMR’s HDFS.
Track loan category: Runs the loan tracker pyspark script.
Moves classified data from HDFS to S3: Copies data from EMR’s HDFS to the data lake’s staging area.
- wait_for_loan_tracker_transformation: This is a sensor task that waits for the final step (Move loan category data from HDFS to S3).
loan_tracker_to_raw_data_lake = PythonOperator(
    dag=dag,
    task_id="loan_tracker_to_raw_data_lake",
    python_callable=_local_to_s3,
    op_kwargs={
        "file_name": "./dags/data/loan.csv",
        "key": "raw/loan_tracker/{{ ds }}/loan.csv",
        "bucket_name": BUCKET_NAME,
    },
)


spark_script_to_s3 = PythonOperator(
    dag=dag,
    task_id="spark_script_to_s3",
    python_callable=_local_to_s3,
    op_kwargs={
        "file_name": "./dags/scripts/spark/loan_tracker.py",
        "key": "scripts/loan_tracker.py",
        "bucket_name": BUCKET_NAME,
    },
)

start_emr_loan_tracker_classification_script = EmrAddStepsOperator(
    dag=dag,
    task_id="start_emr_loan_tracker_classification_script",
    job_flow_id=EMR_ID,
    aws_conn_id="aws_default",
    steps=EMR_STEPS,
    params={
        "BUCKET_NAME": BUCKET_NAME,
        "raw_loan_tracker": "raw/loan_tracker",
        "loans_script": "scripts/loan_tracker.py",
        "stage_loan_tracker": "stage/loan_tracker",
    },
    depends_on_past=True,
)

last_step = len(EMR_STEPS) - 1

wait_for_loan_tracker_transformation = EmrStepSensor(
    dag=dag,
    task_id="wait_for_loan_tracker_transformation",
    job_flow_id=EMR_ID,
    step_id='{{ task_instance.xcom_pull\
        ("start_emr_loan_tracker_classification_script", key="return_value")['
    + str(last_step)
    + "] }}",
    depends_on_past=True,
)

generate_loan_tracker_metric = DummyOperator(
    task_id="generate_loan_tracker_metric", dag=dag)

end_of_data_pipeline = DummyOperator(task_id="end_of_data_pipeline", dag=dag)

(
    [
        loan_tracker_to_raw_data_lake,
        spark_script_to_s3,
    ]
    >> start_emr_loan_tracker_classification_script
    >> wait_for_loan_tracker_transformation
    >> generate_loan_tracker_metric
    >> end_of_data_pipeline
)
Generate loan tracker metrics
To generate your loan tracker metrics, log in to the Airflow user interface. The login and password are both airflow, and you can access the Airflow UI with port localhost:8080 . Switch on the DAG with the play button at the top right corner of your screen. After the DAG executes successfully, your data would be cleaned up and put into your stage data lake, which would then synchronize with your Redshift spectrum.
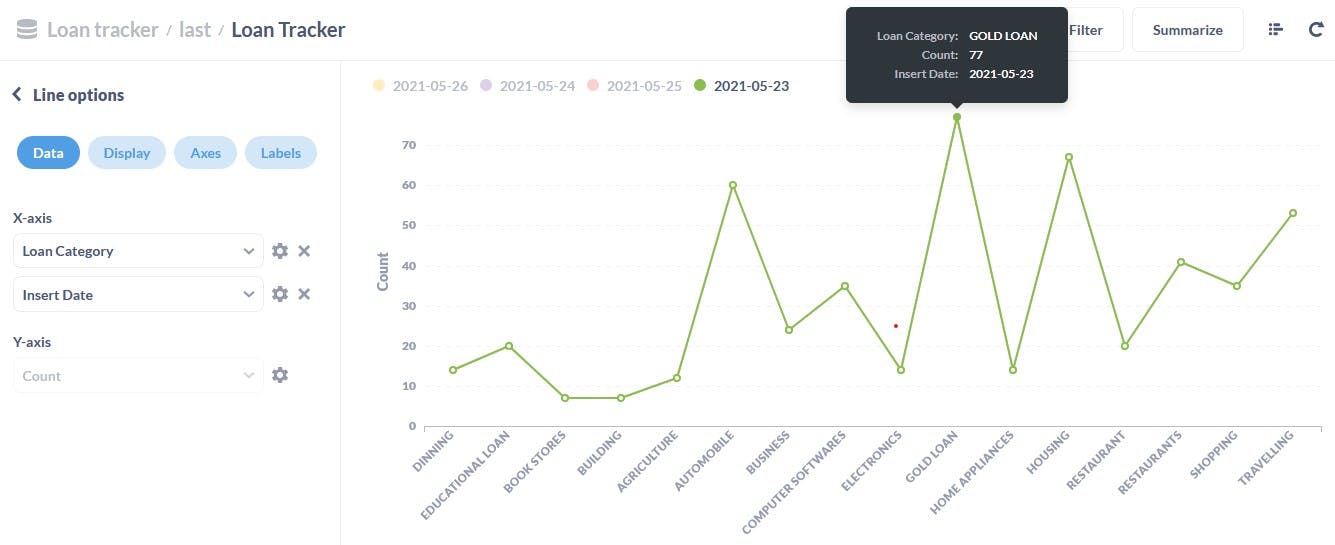
After the DAG finishes running you can access Metabase via localhost:3000 and view the data visually, as demonstrated below.
Don't forget to tear down your AWS infrastructure using the tear_down_infra.sh script after building and testing the data pipeline in your project directory to avoid unnecessary billing :).
./tear_down_infra.sh {your-bucket-name}
Congratulations, using AWS tools, Airflow and Metabase you have been able to run a batch processing job flow :).
Conclusion
This tutorial covered tools from airflow, Pyspark, AWS EMR, AWS S3, AWS Redshift, AWS EC2 instance, Docker, and Metabase for data visualization, which are frequently sort-after tools for most data engineering job roles. This tutorial was made possible by startdataengineering, a great place to start your data engineering journey.
If you have any questions, don't hesitate to contact me on Twitter :).